How to Make Rose Geranium Oil
If you love the beauty and fragrance of geraniums, making your own geranium oil is a simple and rewarding way to capture their essence. In this guide, I’ll walk you through how I made rose geranium oil from my garden, sharing tips for success and ideas for using this versatile, lightly scented oil.
Why Rose Geranium?
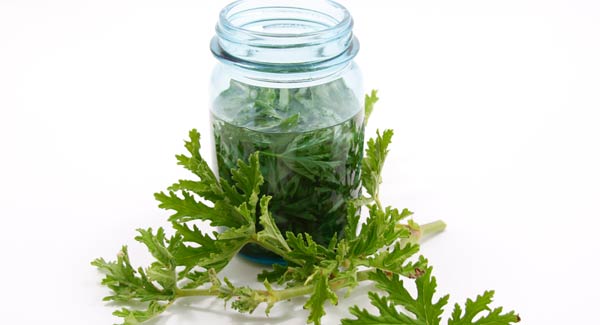
Not all geraniums have a scent, so it's important to choose the right variety for making oil. I used rose geranium, which has a lovely rosy aroma. When selecting a plant, gently rub the leaves or brush against them to release the fragrance - you’ll know right away if it’s a scented geranium.
Steps for Making Geranium Oil
Follow these 8 easy steps, and you'll have your own homemade geranium oil in no time!
Step 1: Gather the Geranium Plant Material
Collect leaves, flowers, and stems - especially the leaves, as they hold the most fragrance. I prefer to pick mine in the morning when there’s still a bit of dew. Gently shake off any excess moisture before bringing them inside.
Step 2: Let the Clippings Wilt
Place the clippings on a towel or paper towels and let them wilt for a day or two (you do not want the plant material to be wet or not dry enough). This helps reduce moisture, which is important to avoid mold during the infusion process.
Step 3: Fill Your Jar with Geranium Clippings
Once the clippings have wilted, cut the leaves, flowers, and stems. Rub them gently between your hands to release the fragrance, then place them in a clean glass jar. Be sure to leave a little space at the top for easy shaking.
Step 4: Add Your Oil of Choice
Fill the jar with your preferred carrier oil until it just covers the plant material. For this, I like using an oil that is light, like fractionated coconut oil, which has a neutral scent that won’t overpower the rose geranium fragrance.
Step 5: Seal the Jar and Store in a Warm Place
Seal the jar with an airtight lid and store it in a warm spot, like a sunny windowsill or a shelf that gets indirect light. I keep mine in my office where I’ll see it and remember to give it a shake.
Step 6: Shake Daily for 4 to 6 Weeks
Give the jar a gentle shake each day for 4 to 6 weeks (I like to infuse as long as possible) to help the oil absorb the plant’s fragrance. For an extra boost, you can open the jar every few days and stir the contents with a wooden or plastic spoon, gently pressing the plant material to release more scent.
Tip: If you want a stronger scent, strain the oil after two weeks and add fresh geranium clippings to the jar.
Step 7: Strain the Oil
After 4 to 6 weeks, it’s time to strain your geranium oil. Use a double layer of cheesecloth over a funnel to strain the oil into a clean container. Squeeze the plant material in the cheesecloth to get as much oil as possible. For a clearer oil, strain again using a fresh piece of cheesecloth or a paper towel.
Step 8: Store and Enjoy Your Geranium Oil
Pour the strained oil into a clean jar with an airtight lid and label it with the date. Store the oil in a cool, dark place. It should last 6 months to a year if stored properly.
How to Use Your Geranium Oil
This homemade geranium oil is all-natural and versatile! You can use it:
- As a natural perfume.
- In DIY facial creams or soap for its antibacterial and antifungal properties.
- Mixed with argan oil as a soothing night treatment for soft, fresh skin.
- After a shower, as part of your skincare routine - apply it after an aloe spritz and before moisturizer.
I love how my geranium oil leaves my skin feeling silky smooth, and the rose scent is calming.
